Upgrade from v1.7.x to v2.0.x
If you are an existing customer and you have our previous version of Lender Spreadsheet Pro that was called Lender Software Pro v1.7.x, then if you have applied for your NEW FREE Upgrade, you can follow these instructions to upgrade your old spreadsheet to the latest version.
We have created a Macro that will automatically upgrade your mortgage files from version 1.7.x to v2.0.x at the click of a button.
You can check what version you have on your v1.7.x spreadsheet by opening the spreadsheet and looking at the Setup Worksheet.
In our example below, the version is 1.7.8 which can be found in Cell M4.

What if I'm running the original version before 1.7.x?
If you have the original version of Lender Software Pro before v1.7, the automatic upgrade will not work and the only possible solution is to manually enter the information into the new template. This is because the original version is very different from 1.7.x onwards.
Quick Links
IMPORTANT NOTES TO READ
DISCLAIMER: This upgrade process is believed to be accurate but is not guaranteed. We accept no responsibility for its use and any losses of your data at any time during this upgrade.
UPGRADE SUPPORT: Because the upgrade process requires a macro, it may be that your Windows computer is unable to run macros or that they are restricted. If that is the case, we are not able to fix that for you as it is down to your own individual setup. This Upgrade Macro is provided as-is as a useful process, but it is not part of your purchase of Lender Spreadsheet PRO version.
Have questions?
We have a useful FAQ for upgrading from v.1.7.x to v2.0.x which contains a lot of information about questions you may have.
Where can my files be stored?
ALL files must be a) in the same folder and b) on the computer hard drive. They CANNOT be on a cloud or virtual drive of any kind. One Drive/Google/Dropbox/any other common or uncommon areas. This is because the macro cannot recognise the virtual addresses.
BEFORE you Begin
1. Download the Upgrade files
PRO customer who have an account can Login and download the upgrade files from within their account.
2. Backup
Before you begin, the most thing is to backup all your mortgage spreadsheets, ideally you should make a copy to another location. A backup is created as part of the running of this Upgrade Macro, but you should also create your own. For example, backup to a USB drive or Cloud storage just in case.
3. Close other Excel files
Please make sure you CLOSE ALL OTHER Excel files, as another file that is open could cause the upgrade to error.
4. Test with our Sample file
You can also download a file called Mortgage Sample v1.7.8.xlsx which is an example file of v1.7.8 of Lender Software Pro, which was the latest of our previous version. This file is the older version of the example file used throughout this User Guide. We recommend that you start by attempting to upgrade this file before you try your own, after reviewing the steps outlined in the following sections.
Download and Save Upgrade File
Firstly, Login to your PRO customer account that you will now have access to after purchasing your upgrade to PRO.
Then, 1) click on the Quick Links Upgrade to the Latest Version or Unlock as shown in the picture below.
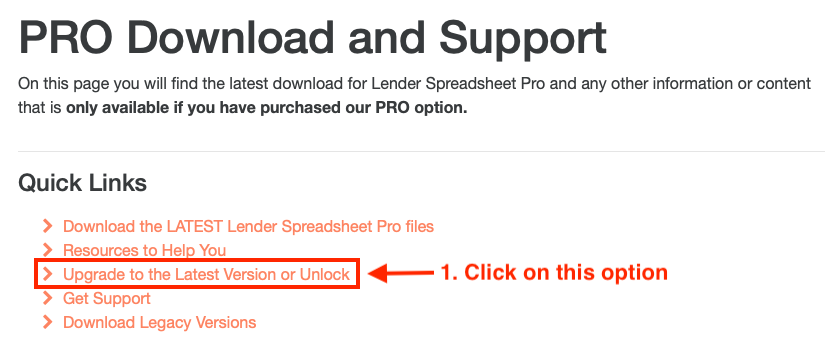
Once you get to the Upgrade section, 2) click on Upgrade from v1.7.x to v2.0.x latest version
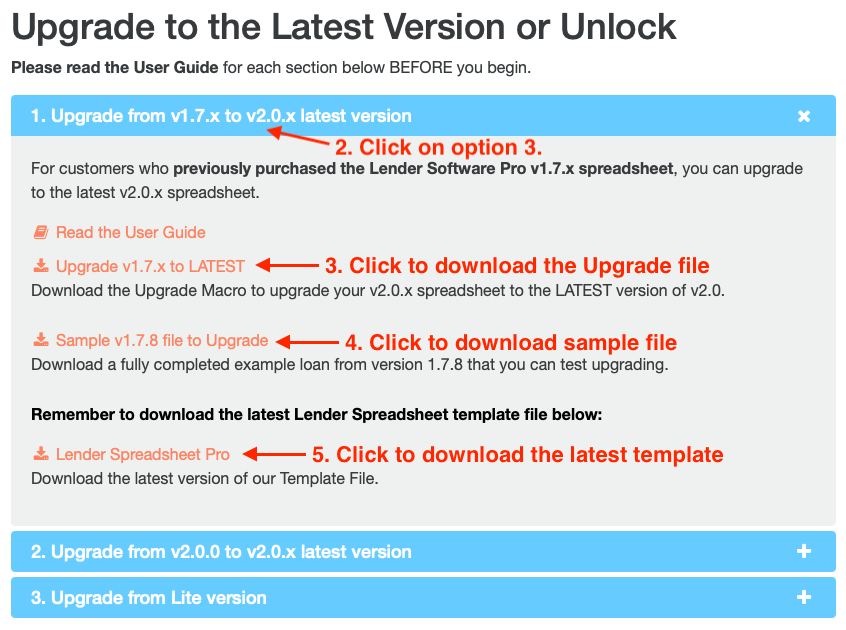
Once you have Logged in to your PRO customer account you can download the Upgrade file, sample and template as shown above.
3) The Upgrade file is called Upgrade to v2.0.xlsm
4) The Sample File is called Mortgage Sample v1.7.8.xlsx and we use this below to test the upgrade.
5) The other file Lender Spreadsheet Pro v2.0.xlsx is the normal blank template file which can also be downloaded in this section..
When you have downloaded these three files, save them in a NEW directory locally TOGETHER.
In our example we are going to use a folder on the Windows 10 Desktop (you can use any suitable local location):
C:\Users\admin\Desktop\Upgrade Spreadsheet tmp\
Mortgage Sample v1.7.8.xlsx is an OPTIONAL file that is NOT required to run the upgrade.

Upgrade Macro Setup
For security reasons, Excel will disable all Macros on opening the upgrade file.
To start the upgrade, open the Upgrade to v2.0.xlsm file you saved in the new folder.
In most circumstances, you'll see the following message below when you open the file. Click on 'Enable Content' to enable the macro. This should allow the macro enabled spreadsheet to correctly load ready to use. Depending on which version of Excel you are running, you may need to configure your installation. Please see Microsoft's article on Macros.

In the next section we will be upgrading our sample file.
To make this example easier, we are using Mortgage Sample v1.7.8.xlsx which we have saved in the same folder.
Run the Upgrade
Start the Upgrade
Once you have saved the Mortgage Sample v1.7.8.xlsx file to the same folder, please click on the 'Select File' button to start the upgrade:

The Upgrade will start by displaying a dialogue box asking you to select the file that you are upgrading.
Select the file Mortgage Sample v1.7.8.xlsx.

As soon as you click 'OK' the Upgrade will begin and will copy over your data from the original spreadsheet to the new template.
The upgrade logs various details about the upgrade process as it runs.
Assuming no errors occur, you will see a dialogue box to advise you that the upgrade has completed as shown below:

If you are running the upgrade again on file you have ALREADY UPGRADED, you will be prompted with a message to ask if you want to overwrite the new file.
Click 'OK' to continue.
If you want to keep the file you have already upgraded, move it to another location. See below for details on where the files are located.

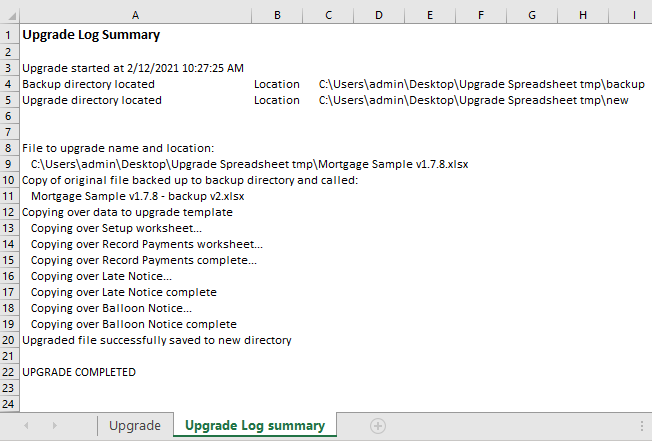
As soon as the upgrade completes, please read the Log to make sure it says that everything copied over correctly.
There is a second worksheet called Upgrade Log summary. This worksheet shows you everything that the upgrade has done and if it completed. If you have any errors, these will be listed here.
Find your Upgraded File
Once the upgrade completes, go to your File Explorer to look at the directory where you saved the upgrade files.
You will see two new directories in the directory you ran the upgrade from with the macro file:
1. backup: This contains a copy of your original file that was just upgraded. This is a copy, not the original file which is only opened and copied, not moved or edited.
2. new: This contains the NEW file you just upgraded to the latest version.
In our example our directories and files look like this:

The backup directory contains the backup. You will notice that the file name is the same along with ' - backup v1.xlsx' appended on to the file name.
Each time you run the upgrade on the SAME file, it will backup the original each time and append a different number on the end, so you could have multiple backups.
In our example we have run the upgrade twice on the same file.

The new directory contains the new file with the SAME file name as the original.
For our example, we are going to rename the file to be Mortgage Sample v2.0.0.xlsx to prevent confusion.
Your file will be named whatever you called it and will be the same name after the upgrade.

The new directory contains the new file. Unlike for the backup, each time you run the upgrade a new version is not created, it will simply overwrite the old one assuming you click on the dialogue box to confirm.
Verify your Upgraded File
Once you have your new v2.0.x file, you need to open it and confirm that everything has copied over ok.
The best way to do this is to open the old file and the new file and compare them.
For example, the Setup worksheet on both v1.7.8 and v2.0.0.

We also recommend that you check your payments on the Record Payments worksheet, especially around the Late Fees in Columns K and L.
In version 1.7.x of Lender Software Pro, if you wanted to override a Late Charge, it was necessary to overwrite the one that was automatically calculated in Column Q.
When the upgrade runs, it should spot whether the Late Charge is automatically calculated or was manually input.
To make sure, please check Cell Q252 on the Record Payments worksheet on your old v1.7.x spreadsheet and compare this to Cell K372 on the new v2.0.x spreadsheet on the Record Payments worksheet. Straight after the upgrade, they should be the same.
Get Support
We are not able to support running the actual macro on your computer, as your computer setup is not something we can change.
However, for PRO customers, we can upgrade a small number of files for you if you raise a Support Request. Please note that in order to upgrade the file, you would need to overtype or delete confidential information before sending the original file to us. After the upgrade, you would need to enter this information back in yourself.
Popular Links
How To
Let Us Help
Get in touch if you’re having problems, need something specific or have questions about our spreadsheet.
Claim FREE upgrade
Existing customers of Lender Software Pro v1.7.x claim a FREE upgrade to v2.0.x
Get started for FREE Today. Register and Download NOW!
Want to Upgrade from Lite to PRO?. Upgrade and Unlock for $79.99
Microsoft® Windows® and Microsoft® Excel® are registered trademarks of Microsoft Corporation in the United States and other countries.
Mac® and macOS® are trademarks of Apple Inc., registered in the U.S. and other countries.